Inonda allows to edit an audio file using markers to edit duration, start and end point of playback.
It's also possible to manage other properties of the audio files loaded in library.
When a file is uploaded, it will always be pre-edited to set Primary markers:
•IN marker
It's the position where playback starts.
It's automatically set where the volume exceed -20dB, to cut silence at the beginning of the song.
•INTRO marker
It's the position of the song where the artist starts to sing. Used as reference for radio speakers who speak at the beginning of the song until the intro is reached.
It's automatically set at the beginning of the second music bar of the song.
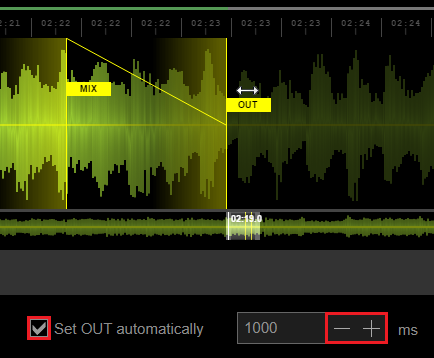
•MIX marker
It's the position where the fade (if present) begins, to allow transition to the next song, during the automatic airing. Fade starts from the MIX marker to the OUT marker.
It's automatically set 50ms before the OUT marker.
•OUT marker
It's the position where playback ends.
It's automatically set where the volume drops -20dB, to cut silence at the end of the song.
It's possible to modify at any time the position of markers from the Editing window.
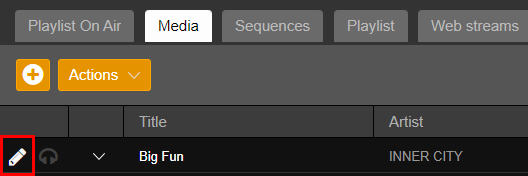
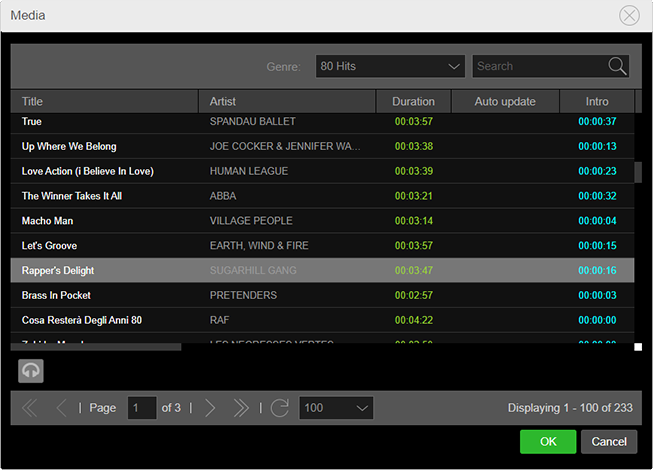
From the Media section on the right select the song to edit, double click it or use the first button on the left of the song.
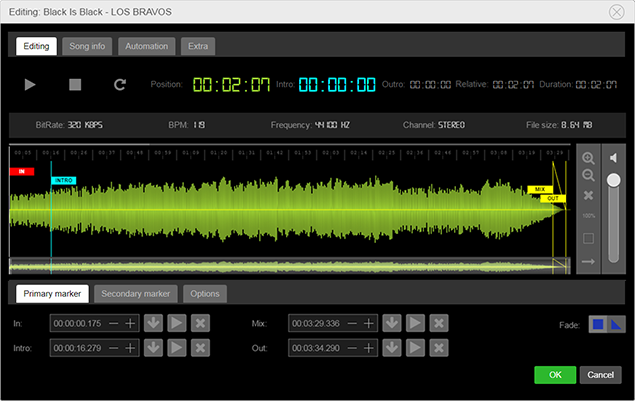
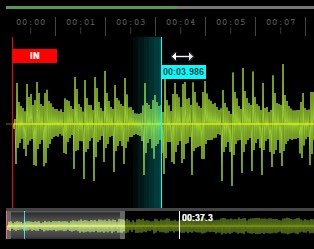
The Editing tab shows the waveform, the volume and the duration of the song and also the buttons to manually set markers position.
For each marker the exact position is showed at the bottom.
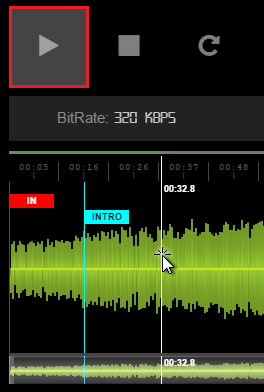
1.Click Play button to start song cue.
It's also possible to start it by clicking directly on the waveform. The playback will start from the position where click was made.
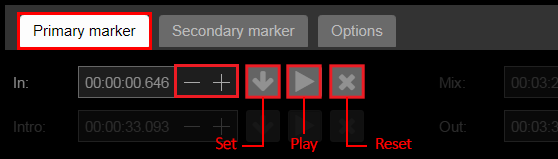
2.On the bottom there are three tabs. Click on Primary marker tab.
3.Every marker has a Set button. Click on the button when playback reaches the desired position. The marker will be positioned exactly in that position.
4.Use the + and - buttons next to the timer to move the marker more accurately. The marker is moved at steps of 5ms.
5.Each marker has a Play button. Click the button to start the cue from the current marker position.
6.To return to the initial position of a marker, click the Reset button of the marker.
7.Each marker can be moved via drag 'n' drop. Hold and drag the marker directly on the waveform of the song.
As you drag, the marker shows on the name label the reached position.
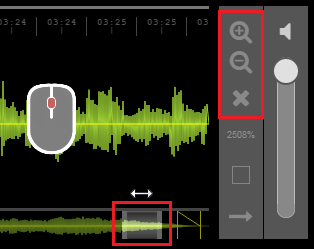
To further optimize the position of the marker, you can zoom the waveform with the scroll wheel on your mouse.
The navigation bar allows you to move quickly on the display of waveform and adjust the zoom level.
On the right there are the controls to adjust more precisely the zoom level, or reset it.
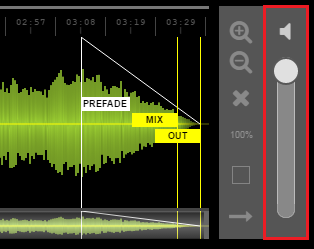
It's also possible to set the playback volume of the song.
The Primary marker tab allows to apply the fade out between the MIX marker and the OUT marker or to not have any volume decrease when the song reaches the MIX position.

The Secondary marker tab below shows on the waveform the secondary markers and the related controls:
•OUTRO marker
It's the position where the song is going to end. Used as a reference for radio speakers who speak on the final part of the song, before the OUT point.
•PRE-FADE marker
It allows you to fade from the user-selected position, instead of the MIX position.
To enable it, click the Enable pre-fade option.
The secondary markers are shown on the waveform only when the Secondary marker tab is selected.

The Options tab contains additional options to facilitate the editing process.

The Mix Test option, if enabled, allows you to listen a preview of the transition between the current song and a song chosen by the user, usually a jingle.
When playback reach the MIX marker, the fade will start til the OUT marker and then few seconds of file used as Mix test will be played.
To choose the file that will be used as Mix test:
1.Enable Mix test option.
2.Click on the button to the right of the option.

3.This opens a small version of the Media section, where you can view all the uploaded songs and if necessary filter them by genres.
Select the file and click OK.
To speed up the setting of MIX and OUT markers is advisable to enable from this tab the Set OUT automatically option. This option adds a separation in milliseconds between the MIX marker and the OUT marker. Whenever the MIX marker changes its position, that of the OUT marker changes accordingly. So you don't have to set also the OUT marker, if not indispensable.
|
Remember Cue through the Editing window takes place locally, using the operating system's default audio device. The cue will therefore not interfere with the main broadcast, which instead will be transmitted exclusively via streaming. |
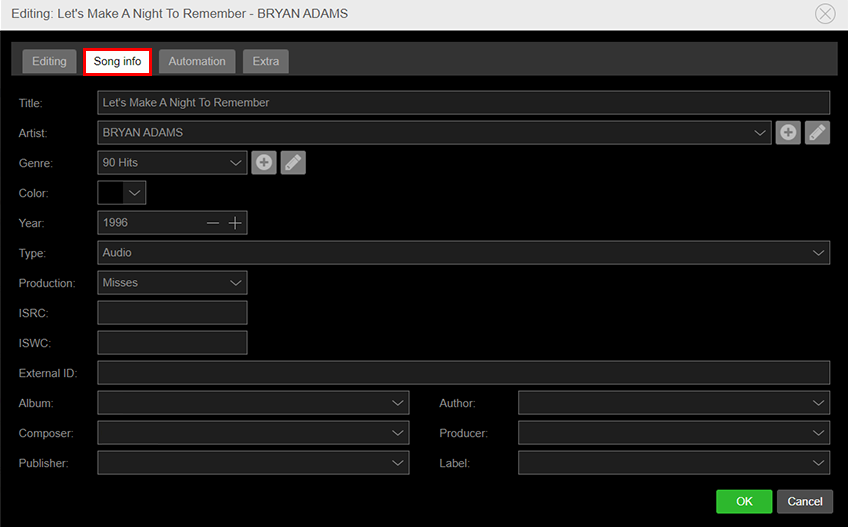
The Editing window contains also the controls to change some properties of the song. You can access these controls from the other three tabs:
•Song info
It contains the main song information, which will be shown in the main interface, such as Title, Artist and Genre.
-Title
Allows you to change the title.
-Artist
Allows you to change the artist of the song, add a new one or modify an existing one.
-Genre
Allows you to insert the song in a genre, create a new genre or modify an existing one.
-Time notice language
Selects the voice language for the time notice. The option is visible only for elements present in the Time genre.
-Color
Allows you to set a color for the song information on the interface data grids.
-Year
Allows you to insert the year of the song.
-Type
Allows you to insert the type of song.
-Production
Allows you to insert the production of the song.
-ISWC
Allows you to insert the ISWC (International Standard Musical Work Code) of the song.
-ISRC
Allows you to insert the ISRC (International Standard Recording Code) of the song.
-External ID
Allows you to specify the song ID to be used for importing external playlists.
-Album
Allows you to insert the album of the song.
-Author
Allows you to insert the author of the song.
-Composer
Allows you to insert the composer of the song.
-Producer
Allows you to insert the producer of the song.
-Publisher
Allows you to insert the editor of the song.
-Label
Allows you to insert the song label.
•Automation
It contains automation parameters like linked categories and on air rules.
-Categories
Allows to assign the song to one or more categories or add a new one.
-Validity
Allows to set a Start and End date of validity.
-Separations
Allows to set the number of hours for Artist separation and Song separation.
-Check file date
If the file is not updated within the selected range it will be skipped during the airing. The option is visible for dynamic files only.
-Hours and months allowed
Allows to select the hours allowed and months allowed for the song.

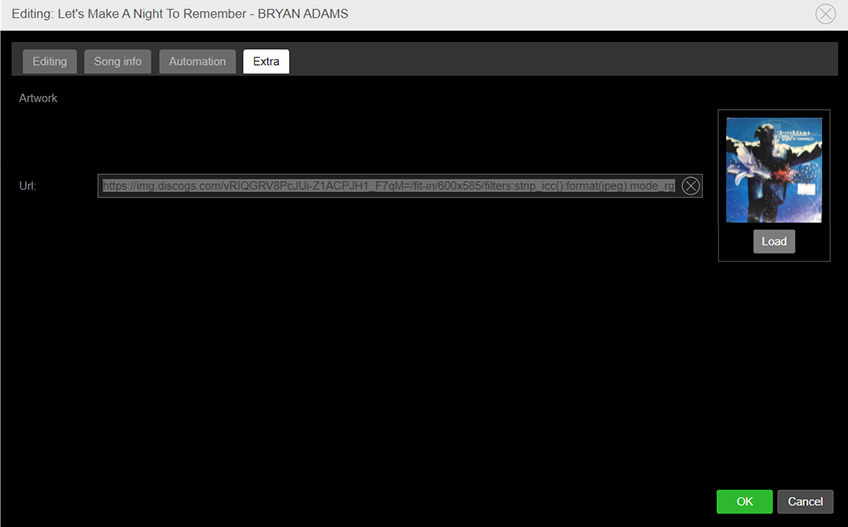
•Extra
Allows to assign a custom artwork to the song so it will be shown on the streaming player. It's possible to upload an image from the computer or insert an URL to an already uploaded image.